the Coffee Journal

The 1-Minute Guide to Cleaning Your Coffee Grinder [CHEAP & EASY]

Do you want to brew coffee that’s criminally good? If so, then you must maintain your coffee grinder properly so the old grounds trapped inside won’t get in the way when you try to brew a cup of clean and balanced coffee.

  • Does your coffee grinder smell like stale coffee?
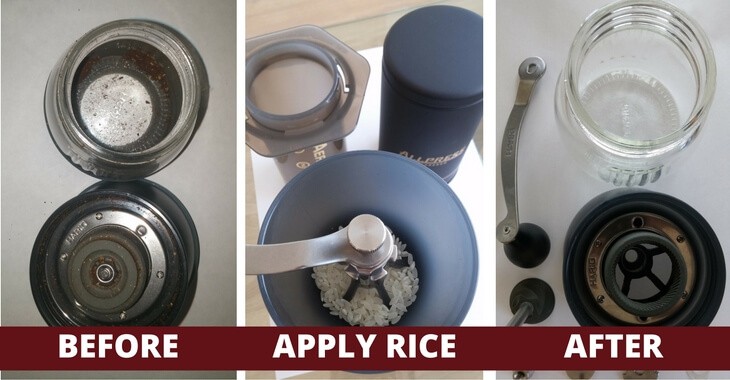
  • Are there grounds stuck between the burrs?
  • Perhaps your coffee started to taste a little bit more hashy & bitter than usual?

If it’s YES to any questions above, then you need to read on…

What You'll Learn from this Guide

  • How often you should clean your coffee grinder
  • How to clean your machine swiftly with cleaning tablets
  • The cost effective technique that involves using minute rice
  • The deep cleaning method that’ll make your coffee grinder as good as new

The 1st two methods both take less than 1-minute to do!!!

How Often Should I Clean My Coffee Grinder?

The answer to this question is based on how regularly you use your coffee grinder and the type of beans you’re using.  Normally, if it’s heavy-use, like in a coffee shop or other commercial settings, then you should clean your coffee grinder once every week or two.  If the machine is used for espresso, which typically uses darker and oilier beans, then you should clean once a week.

If it’s for personal use, once every month or two would be perfectly fine.​

Cleaning Tablet Method [Easy-To-Do]

The first and easiest method I’ll teach you is using cleaning tablets. There are a few cleaning tablets brands out there, but my favorite is the Urnex Grindz.

Urnex Grindz are cleaning tablets that are shaped like coffee beans; they’re food-safe products that’re made from grains such as wheat, oat, and cereal. These cleaning tablets remove oils, stale coffee, and any residue stuck inside the burrs and casing WITHOUT the need to disassemble the coffee grinder. By using cleaning tablets, like the Urnex Grindz, you can clean your coffee grinder quickly and efficiently.

Urnex Grindz is made from wheat, don’t use if you run a coffee shop or if you’re allergic to it.

They’re very simple to use, here’s the instructions on what to do:

What You Need To Do...

Equipment & Materials

  • 1.2oz (35g) Urnex Grindz Cleaning Tablets
  • Some coffee beans (preferably old and discardable)

Instructions

1. Clear out the bean hopper to make way for the cleaning tablets.
2. Put 1.2oz of Urnex Grindz in the hopper and run the machine.
3. Put some old coffee beans in the hopper and run the machine.
4. Remove the resultant mixer from the container and it’s ready for use again.

URNEX GRINDZ CLEANING TABLETS

ONE OF THE EASIEST CLEANING METHOD!!!
The Barrister's VERDICT:
4.5/5

Rice Cleaning Method [CHEAP]

The second method I’ll teach is the most cost effective. It’s very similar to the first, but instead of using cleaning tablets, use plain, uncooked, minute rice instead.

The idea behind using rice is to purge old grinds and residue that’s trapped inside the grinder.

Rice Cleaning Method Before And After

What You Need To Do...

Equipment & Materials

  • ¼ cup of plain, uncooked, minute rice
  • Some coffee beans (preferably old and discardable)

Instructions

1. Empty the bean hopper by storing the coffee beans somewhere else.
2. Put ¼ cup of rice in the hopper and run the machine.
3. Put some old coffee beans in the hopper and run the machine.
4. Remove the rice and old bean grinds from the container and you’re ready to go.

Remember to use older beans to clean out whatever leftovers there are from the rice!

If you’re using a blade grinder, read this guide to learn how to clean it with rice.

Deep Cleaning Method [THOROUGH]

The last method is the most thorough of the three. There are two steps and takes a while to do, I don’t recommend you using this technique more than once every 6 – 12 months.

Here are the instructions:

What You Need To Do...

Equipment & Materials

  • Soft brush or cloth
  • Mini vacuum

Instructions

1. Empty the coffee grinder.
2. Remove portable components, rinse and wipe them with either a brush or cloth.

Skip this step if the components are metallic or electrical – they’ll rush or short circuit, you don’t want that!

3. Wipe any remaining portable or reachable components.

Pay extra attention to the burr’s grains as it’s more effectively to wipe in the same direction.

4. Turn on your mini vacuum and suck out as many of the remaining grinds inside the grinder as possible.

Through these four steps, you’ll bring the coffee grinder back to top shape. I’ll end this article with one of Seattle Coffee Gear’s video where they show you how to wipe and clean in more detail. [NOTE] The wipe and vacuum part in this video is transferable across all coffee grinders.

RELATED POSTS

Share this post

Facebook
LinkedIn
Twitter
Pinterest

Leave your thoughts and comments